My Virtual Sanity

Have you ever felt the need to share your thoughts with virtual strangers just so you can pretend that you have adult conversations during the day? Well, that's what I'm about to do. Be prepaired for my life as a stay at home, obsessive knitter, and my attempts to stay connected with the rest of the world.

My Photo
Name:
Location: Denver, Colorado, United States

Tuesday, February 28, 2006

Making Beautiful seams- A tutorial

Ok, This is my first official tutorial. Someone asked on the Knitlist how to seam 2 pieces together that are going in opposite directions. I sent them a link to knittinghelp.com that I thought showed it. It did not. I can't for the life of me find the tutorial that I used to learn this technique, so I have decided to make my own tutorial so that this knowledge may be passed on. We should all be able to make beautiful seams. After all, if I can go from bulky ugly crochet seams to this, then anyone can.

Making beautiful seams takes time and patience. Please don't rush this. If you need to, chant to yourself "Proper finishing will make or break my project." I would really hate to see a garment that you have worked so hard on be messed up by sloppy finishing.


The Mattress Stitch
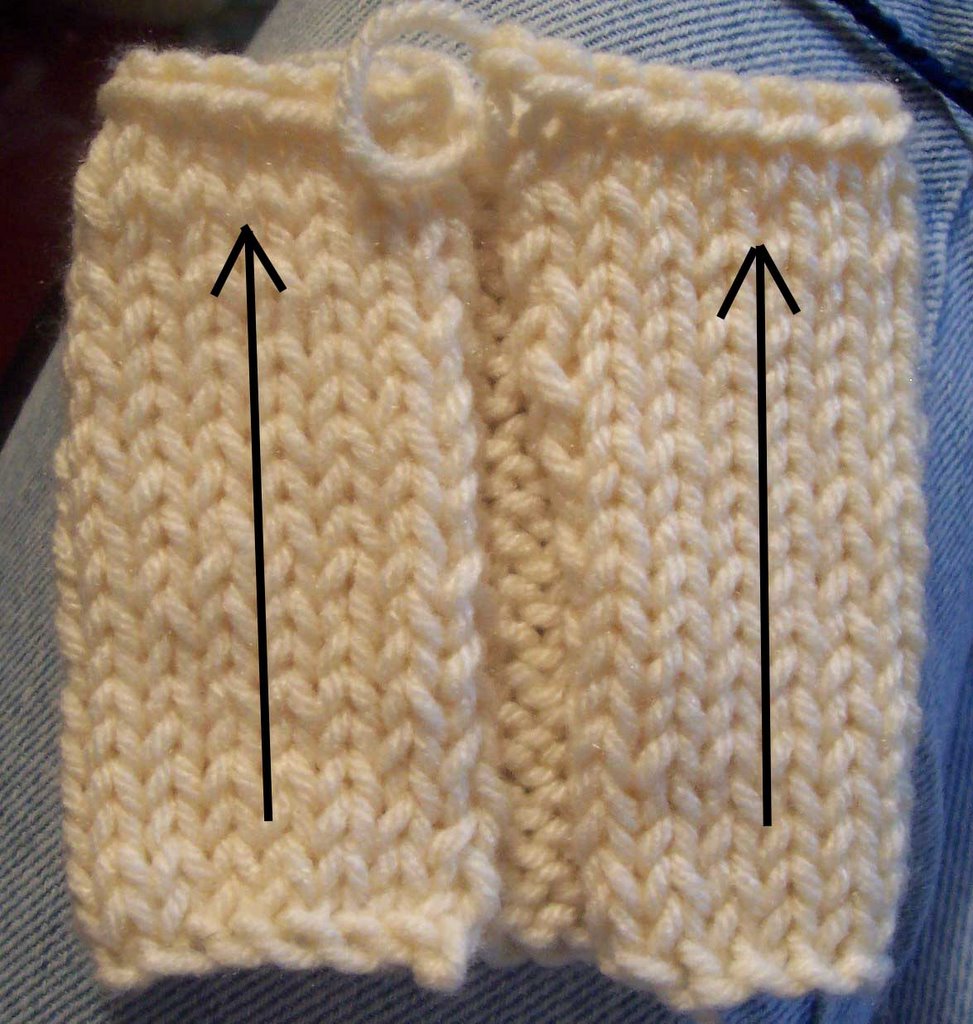
This stitch is used to connect the sides of 2 pieces, like this. It is most frequently used in sleeves and sides of sweaters. When done properly, it will create a beautiful almost invisible seam.


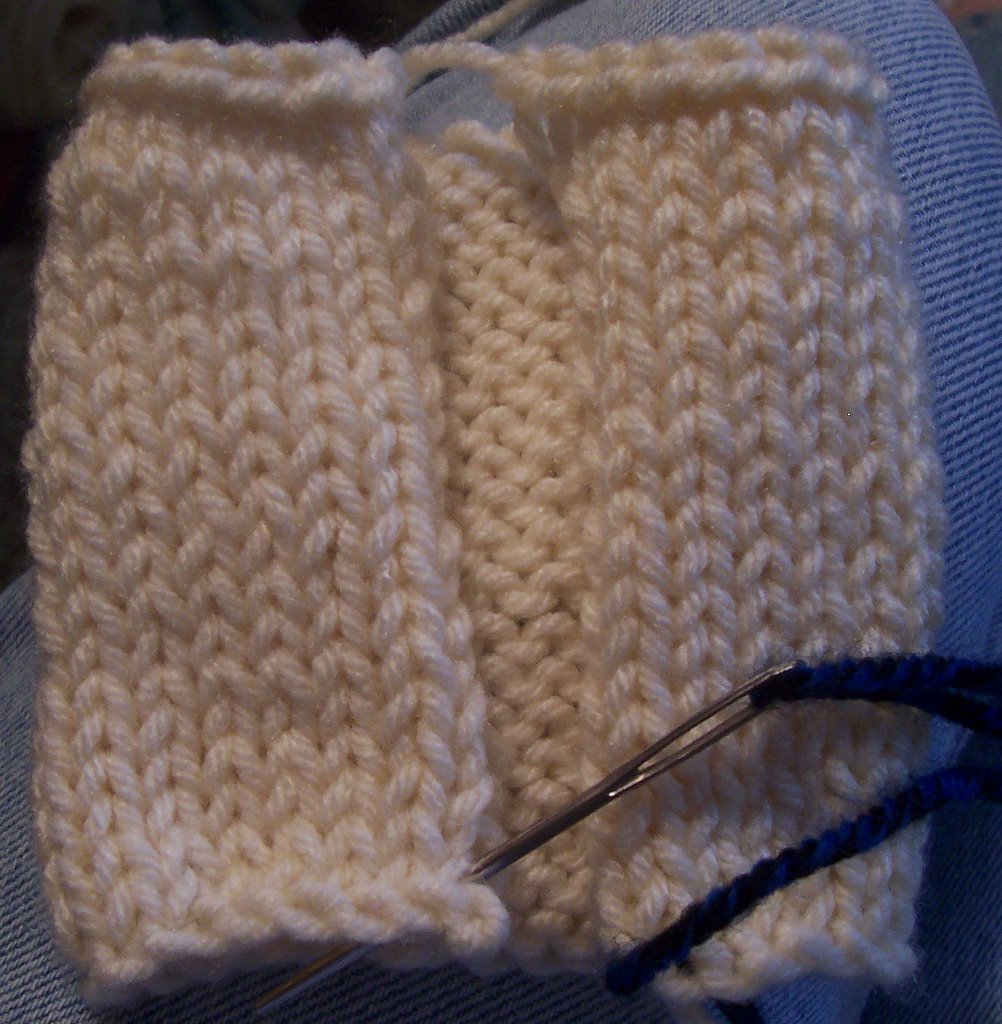
Begin by tacking the 2 pieces of fabric together. Insert the needle in between the first and second stitch lines in your fabric. Do the same on thee other side. Go back and forth in a figure 8 between sides once or twice and pull it snug. This will pull them together firmly without the need for a knot.


Next, Locate the Running threads between the stitch lines in your fabric. Simply stretch the fabric apart a bit and you will see them. They are the horizontal lines that connect one stitch line to the next. You will be sewing the running threads from one piece of fabric to the other in order to seam your pieces.


Insert your needle your needle under the running thread that goes between the first stitch line and the second on your right hand piece of fabric. Pull your yarn through. Now, do the same for the running thread on the left hand piece of fabric. Alternate between the 2 pieces of fabric, sewing through one running thread on each side. Pull the yarn snug between each set of stitches. Periodically check your work to make sure that you are not farther up one piece of fabric than the other. If you are, it's ok, simply pick up 2 running threads on the side that is behind to every 1 on the side that is ahead until it catches up.

When completed properly, the seam will magically disappear! On the left, I have included a black line to show you where the seam is. Please note that even though I am using a dark blue yarn to sew with for pictorial purposes, that it completely disappears.


Vertical to Horizontal Seams:
This is used to join 2 pieces of fabric that are going in opposite directions (such as the side of one piece with the top of another). This seam will never be invisible, as you can definitely see the change in direction. When done properly, however, it should look as if someone picked up stitches along one side and simply kept knitting rather than seaming 2 totally separate pieces of fabric together.


We will be using the same principles for this type of seam that we used for our side by side mattress stitch. You will notice, though, that while one piece of fabric has the running threads like we used before...

The other does not. It has a crisp bound off edge at the top. We will be using the V stitches in place of the running threads for this piece of fabric. Insert your needle through the running thread of the side that has them. Then insert your needle through the corresponding V stitch on the other piece of fabric as shown. Pull the yarn through and pull snug between each set of these 2 stitches. Continue to alternate 1 running thread for 1 V as you did for the mattress stitch above.

Knitted stitches are fatter than they are tall. This means that it takes more rows (running threads) to equal the same number of stitches (V stitches). Keep a very close eye that you are progressing along both pieces of fabric at the same rate. It WILL be necessary to sometimes pick up 2 running stitches for every V stitch, but not always. If you are mathematically oriented, you can count the number of stitches that you have, and the number of rows and figure out exactly how often you need to pick up 2 threads to each V, but I am not this much of a perfectionist. Eyeballing it is fine, just keep on top of it.

When completed your sewing yarn again disappears like magic. The seam should be straight and appear as if someone simply picked up stitches through those running threads and just kept on knitting. I'm sure you can see the seam, but again I have included the line to show you where it is on the left hand picture.


Shoulder Seam:
We'll call this "Shoulder Seam" since that is it's primary use. This is the grafting together of the tops of 2 pieces (or the bottoms, or 1 top and 1 bottom). Because of the bulky nature of a bound off edge, this seam will not be completely invisible, nor will it lie completely flat. If you wish it to be invisible, then I would suggest that instead of binding the edges off, you leave them live and graft the 2 pieces together using the Kirtchner stitch. For heavy sweaters, however, the bound off, then seamed shoulder provides added support for the weight of the sweater so that it doesn't sag.

We will not be using running threads for this seam. Instead we will be using what I call "A" and "V" stitches. If you take a good look at your knitting, you will notice that all stockingette fabric has both of these hidden in them depending on how you look at it.

To begin, Slide your needle under the "V" stitch just as you did for the horizontal to vertical seam. Then slide your needle through an "A" stitch on the opposite piece. Why not just to both "V" stitches? Well, you can, but for those of you perfectionist knitters, by using the V's on one side and the A's on the other it makes continuous lines of knitting. The V's go up one side and continue down the other in an unbroken line. If you use V's or A's on both sides, the direction of your lines will change from V's to A's once you pass the seam.

Continue alternating 1 stitch on each piece of fabric as you did for the previous seams. Pull the thread tight to hide your sewing thread as you go.

23 Comments:

Blogger Rachel Siegel said...

what a great tutorial. i'm a knitter myself and this tutorial is great to pass on. i'll have to show it to my mom. she hasn't really figured out how to sew things together so she always makes me do it. i've been looking for a good tutorial for her and i think i've found one.
my blog is rachelsknitting.blogspot.com
check it out sometime,
rachel

3:20 PM  
Blogger FuguesStateKnits said...

Thank you so much! This is one of knitting's biggest "pains" isn't it? With your tutorial and Janet Szabo's The I Hate to finish guide to finishing Sweaters, I'll be set:)
Thank you so much for taking the time to do this,
Regards,
Joan G

7:21 AM  
Blogger Unknown said...

Nice tutorial! Someone at Knittinghelp's forum just linked to it, which brought me here. Mostly I'm posting to say, though, that I'm totally enamoured with your recycled-yarn ebay store! Love the store name, the concept, the environmentalism and thriftiness, and the wonderful presentation and care you clearly put into your yarns....I just LOVE the idea.
Amy Finlay
website: www.knittinghelp.com

11:12 AM  
Blogger HomeMadeOriginals said...

Your tutorial is awesome. I also found a video here:
http://www.knittinghelp.com/videos/knitting-tips

I really liked how you showed the different variations of how this works with different situations.

7:22 PM  
Blogger Cretemum said...

Thanks so much for this; after many years of many scarves and many many soft toys, I have finally finished knitting my first wearable garment; a cardigan.
I have been so frightened to attempt the seaming but now I am ready! Mattress stitch here I come. Thanks.

1:10 PM  
Blogger fiddlewitch said...

thank you so much for the "V" and "A" part. that's what made the shoulder seams work for me. i saw them but hadn't turned it into the continuity of a "V" fitting into the "A" for a relatively seamless line. this is my first sweater in pieces and now i may survive...

6:36 PM  
Blogger SleightGirl said...

Excellent tutorial! I'm saving this in case someone asks me the same questions.

9:05 AM  
Blogger Fonenurse said...

Fantastic tutorial - thank you!

8:23 AM  
Blogger Unknown said...

This was great - so clear! Would you happen to have any suggestions on sewing up garter stitch squares (one vertical, the next horizontal) - I'm desperately looking for a way to do it without completely ruining my (several years of work) garter stitch square afghan!

9:44 PM  
Blogger Unknown said...

An excellent tutorial! Thank you so much for posting! Being a relatively new knitter who just ventured into knitting sweaters, I couldn't figure out for the life of me how to seam. Again, thank you!

7:53 PM  
Blogger Daytona Elevator said...

I prefer to use a 3-needle bind-off for the shoulder, but I don't know how to do it for a sloped shoulder.

Can you help with that or must I continue to use the Kitchener stitch?

Also, I can't thank you enough for the toe-up tutorial. You made it look really easy so now I'm off to try it.

10:27 AM  
Blogger Unknown said...

Was this perhaps the tutorial you had in mind? Yours is very clear, but pictures are always nice...

http://www.vogueknitting.com/pattern_help/how-to/beyond_the_basics/seaming.aspx

7:10 PM  
Blogger Unknown said...

HA! First time through the photos didn't show up. So sorry!
Beautiful tutorial!

7:12 PM  
Blogger Auto Angel said...

Buy branded ortho mattress with free 24 hr delivery

6:19 AM  
Blogger Beverly said...

Thank you so much Dawn, I am teaching Ruby, my 18 year old, and her friend to knit.I often confuse them as I am left handed so your fab illustrations are a great help. Regards from the Isle of Wight, England

11:09 AM  
Blogger beth said...

thank you for this! how would you do the shoulder seam if the stitch was garter? thanks!

10:23 AM  
Blogger Katie said...

I will refer to this tutorial often.
I love it as you make it so clear to see what I should be doing.
You're a life saver. Thank you, Katie

7:13 AM  
Blogger Pippy said...

I seemed my first knit garment several months ago, and luckely I found this entry in your blog. Since then, whenever I need to seem something, I look over this page. Thanks for the excellent pictures and explanations, they really held my hand when I needed it.

6:51 PM  
Blogger AliceAcademic said...

Thank you for awesome tutorial!

1:08 AM  
Blogger Lily said...

Great instructions!! Thank you! BTW the weaving stitch for toes of socks, etc is called Kitchener Stitch. It is named after a World War I British General Lord Kitchener. Lily

9:07 AM  
Blogger worldwidenana said...

Love to knit, hate to sew up - until now. Wow, what a wonderful tutorial. I will not look at finishing a garment the same way again. Got the link through www.knittingparadise.com forum. Thank you so much for taking time to do this.

7:13 AM  
Blogger Suzanne said...

I love your tutorial. I found it a while back when I started to sew an afghan I was knitting. Today I have to finish sewing it together now that I'm done knitting it all. I absolutely love your explanations and photos also. It makes it so easy to figure out. Thank you for doing this tutorial for us.

12:01 PM  
Blogger Adam Micheel said...

Creating beautiful seams is an important aspect of sewing and crafting. Whether you're working with fabric, paper, or other materials, well-executed seams can enhance the overall appearance and durability of your projects. Select thread that matches your fabric or material in color and weight. Using the appropriate thread will help your seams blend seamlessly. If you have any old vehicle, you can sell it to Cash For Scrap Cars Bankstown service and get instant dollars.

6:08 AM  

Post a Comment

<< Home